Stuffed 8-ball Zucchini

A friend and I went to our local (Pasco) farmers market this last weekend. We came across 8-ball zucchini.  They were so cute and the perfect shape for stuffing, so I had to get some. I started with a recipe my mom had used in the past, and then modified it into kind of a “just throw stuff in” recipe.  🙂  I also changed the ground beef it called for, to ground turkey, to cut the fat in half. (Don’t worry, the cheese and sour cream make up for it LOL). I didn’t really measure anything either, so I’ll do my best to estimate the measurements for you, but just add to taste as you go. Here’s what I ended up using

Ingredients –

4-6   8-ball (round) zucchini

1 lb ground turkey,

1 medium onion, chopped

Cumin (approx. ½ tsp)

Cayenne (approx. ½ tsp)

Onion powder (approx. 1 tsp)

Sour cream (approx. ½ C)

Spinach leaves, chopped (approx. ½ C)

Sharp (yellow or white, I used yellow) Cheddar cheese, shredded (approx. 1 ½ C)

Sweet Baby Ray’s BBQ sauce (approx. ½ C)

Chicken flavored (dry) stove top stuffing (approx. 1 C)

Salt & Pepper

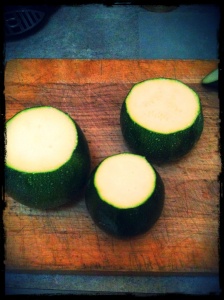
 Preheat your oven to 400. Slice off just the top of the zucchini (and toss tops).  Carefully hollow out the zucchini (kinda like carving a pumpkin), but leave about a ¼ inch of the zucchini intact around the inside. (I’m not sure how to really describe that, so I hope that makes sense to you!). 

Chop the “guts” that you removed and set aside to combine with your filling mixture.  Lightly brush cooking oil (any kind) on the inside of the zucchini, and place upside down on a baking sheet.  Bake at 400 for about 15 min until softened). (Turn them over when done, and let them cool a little. Turn the oven down to 350.

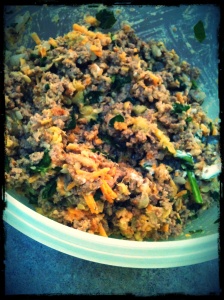
In the meantime, in a skillet, brown your ground turkey (salt and pepper it while cooking), and add the onion and zucchini guts. Let that cook together for several min, then remove from heat.  In a bowl, mix the ground turkey mixture, with all the other ingredients, reserving ½ C of the shredded cheddar to top with.  Again, adjust the spices to taste as you go.

Once you have the taste you want, use a spoon to add the mixture to your hollowed out zucchini.  Fill them to the top. Sprinkle with sharp cheddar cheese.  Bake them at 350 for 15-20 minutes, until the cheese on top is bubbly and melty. 


Enjoy!  🙂

Creative Friends

I have to say that I have some EXTREMELY creative friends.  In the last two weeks, I have seen two of THE cutest desserts.  We had a bake sale at work that was organized to raise money for the American Cancer Society’s Relay for Life.  A gal I work with, brought in these absolutely adorable “Hootie Brownies”.  They were chocolate brownies (baked in a cupcake shape), topped with chocolate frosting, two open-faced Oreo cookies and junior mints for the eyes, and a banana runt for the nose.  (Yeah, NO sugar in them whatsoever).  So adorable!!

This next one was made by another friend of mine, who’s daughter is getting married next month, so she was on the hunt for something cute to make for her shower.  Boy did she ever find it! She ended up making these awesome little bride and groom heart cookies.  Aren’t these AMAZING/  Talk about attention to detail (and PATIENCE!). 

Kudos to them both! They are so cute!

Carmel Corn Bars

Emma took a break from swimming in her “pool” outside to help me make these bars. I’m sure it had NOTHING to do with wanting to “sample” things in the process. 😉  Here’s what you’ll need:

1 roll refrigerated chocolate chip cookie dough

3.5 C mini marshmallows

1 bag popped microwave popcorn (butter flavor)

2/3 C light corn syrup

1/4 C butter

1 bag peanut butter chips

1 C semi-sweet chocolate chips

 Pre-heat your oven to 350. Start by smushing (technical term) the cookie dough into the bottom of an 8×8 greased baking dish. If you cook with your kids, this is a great one for them to do. Bake them for approx. 15 minutes, or until the surface looks “dry”.

Meanwhile….In a large sauce pan, melt together the corn syrup, peanut butter chips, and butter.

Once the cookies have been removed from the oven, sprinkle the marshmallows on top of the cookie layer (this is another fun step for kids), and put it back in the oven for about 5 min (until they puff up).

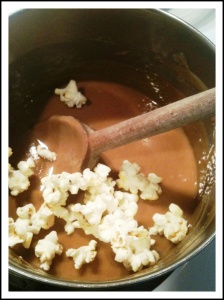
Add the popcorn to the corn syrup mixture and stir until combined.  Then press on top of the marshmallow layer.

Drizzle with the melted chocolate chips.

Let it cool a couple of hours….then get ready to slip into a nice tasty sugar coma. Haha! Which is precisely why I brought these in to work with me…..so they will disappear FAST.  🙂 

Project: Stamped Metal Key Chain

I purchased the mini hammer and metal alphabet stamp set at Harbor Freight for about $15 (together).  The washers I picked up a Lowes.  You can find just about any size you want, but remember…..the bigger they are, the heavier they are on your key chain.  😉  As for the key rings, I recommend if you don’t already have them, you purchase some at a craft store….NOT a hardware store.  I bought a whole bag of about 25 of them at Hobby Lobby for 1.99, vs. the same amount for a 2 pack at Lowes. Plus you can get colored ones if you want.

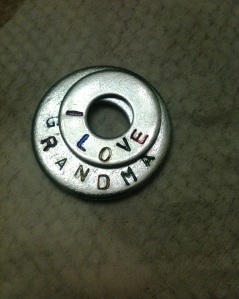
This is a project you are going to need to do on concrete (or similarly hard surface). Lay your washer down, and place the metal stamp where you want it on the washer, HOLD IT TIGHTLY, and give it 2-3 good hit’s with the hammer.  It’s REALLY important to hold it tight so it doesn’t wander on you.  You will “lose” the look of the letter if it does.  Also, once you center the stamp on the washer, hold very still.  This can be a bit of a challenge, and as you can see by the placement of the “G”, I didn’t do a great job of that.  Hopefully you can do better! 🙂 

Once you stamp all of your letters, use a Sharpie to color them in.  Wipe off the extra ink with rubbing alcohol or a baby wipe. I used a baby wipe, because as you know if you know me, or follow my blog, that baby wipes are good for just about EVERYTHING!!

Here is the finished key chain.  Grandma LOVED it.  🙂


A quick update

Well, I have not posted in a little while and have been reminded to “do so”.  So I am!  I have lot’s to catch you up on.  Let’s see…..where to start…..

My biggest news is that I have been accepted to exhibit my oil paintings in the August 2nd Kennewick Art Walk (read about it here). I was SO EXCITED to get this news!  This means my work officially passes muster. I will have 10 or so paintings on display (also for sale).  If you are in the area, come down to the exhibit and check it out. 🙂  It’s from 5:00pm – 9:00pm Thursday, August 2nd. There will also be 5 other artists work on display.  Here are a couple of my paintings to give you a little “taste” of what I’ve been working on…. 


It’s been quite the learning process working with oil paints.  (If you have not read about my very first experience with them, click here).  Between trial and error, asking questions, and reading things on-line, I have managed to increase my knowledge A LOT.  It’s awesome what you can find on that there internet web these days huh? 😉  And here I thought I would stick with Acrylics, cuz they are “easy”…..but I just cannot resist the vibrant colors of Oils.

Let’s see…what else….I got all of my flowers, herbs and some lettuce planted…the lettuce is doing well!  Of course, living in the desert helps…everything loves SUNSHINE (including me).

Here is right after I planted them…

Here they are last week….. (they’re even bigger now yay!)

We had a beautiful Mothers Day weekend.  The weather was beautiful, I got a lot of planting accomplished. Even had some time to volunteer down at one of our local pet rescues POPP (Pet Over-Population Prevention) on Saturday. Every time I go down there, it’s a challenge for me not to load all the pups up in my Explorer and bring ’em home with me. Emma has picked up a love of animals from me as well.  Grandma brought her down to the adoption center for a little while so she could keep the dogs company. These were her favorite (no surprise)….

We had an awesome brunch with my Mom and her best friend Pam, and of course Emma.  Here are a few pics from the day….

Emma and I made Grandma’s Mothers Day gift (of course). It was nothing fancy…but she loved it….cuz that’s what Grandma’s do….love everything.  🙂  You can see it here

 The school year is coming close to an end, so the kindergartener’s had their end of year program.  Here is a picture of Emma during the program.  She is holding the “G”. I was so proud of her!


So there’s a short update for ya. I’ll post more soon. Have a great day! 

Cinnamon Ring

No, it’s not healthy…but it’s oh so good….

Cinnamon Ring

This is similar to my step-mom Lulu’s recipe for Monkey Bread, but its a little less labor intensive. 🙂  I have no idea why its called monkey bread….there are no monkey’s or monkey parts in it, and it’ doesn’t resemble a monkey….it’s a mystery to me.

Anyway, All you need, is 2 tubes of refrigerated biscuits, 3 tbsp. melted butter, 1/2 cup maple syrup, 1/3 cup packed brown sugar (light), 1/2 tsp. cinnamon. (You could also add chopped pecans or walnuts, but I don’t like nuts in my food, so I didn’t).

Preheat your oven to 375. Spray a bundt pan with non stick cooking spray. Mix the melted butter and syrup in a bowl. Then mix (in separate bowl) the brown sugar, cinnamon, (and nuts if you are using any). Drizzle half of the syrup/butter mixture into the pan. Sprinkle half of the brown sugar mixture in the bottom of the pan.  Lay the biscuits on the bottom of the pan, overlapping the edges (pretty close together to form a ring. Top with the rest of the syrup/butter mixture, and then the brown sugar mixture.

Bake at 375 for 30 minutes, or until the top is golden brown.  After you remove it from the oven, let it cool in the pan a couple of minutes so that the syrup and sugar start to harden a little. Then place your plate on top of the bundt pan and flip it. Enjoy! 

Greek Quesadilla’s

Another super easy, ALMOST no cook recipe that is DELISH!!

Greek Quesadilla’s

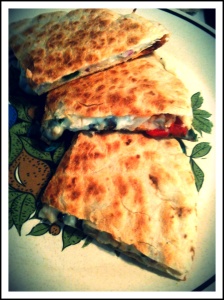
I am a cheese lover, and one of my favorites is Feta (although I REALLY don’t like the smell of it). I wanted to figure out a quick and easy way to enjoy some feta, so this Greek quesadilla fit the bill! 

Here is what I used…..


Roasted red peppers (diced), sliced black olives, red onion (sliced), chicken breast (diced), fresh baby spinach (chopped), dried parsley (you could also use oregano, but I was out!), taco sized flour tortillas, Greek feta cheese, mozzarella cheese.

Put your tortilla down in your warmed skillet (medium heat), put a thin layer of mozzarella on first, this is your “glue” for the bottom. 🙂 Then layer on all of your other ingredients as you please.  Finish with another layer of mozzarella on top (more “glue”), and top with another tortilla. Once the bottom tortilla is nice and brown, flip, and brown the other side.  By this time, all your cheese will be all melty and nummy! 

I cut mine into wedges.  You could also serve this with a greek tzatziki (click here for a quick recipe for tzatziki) for dipping if you want, but I found it was scrumptious all by itself! Enjoy!

Caprese Sandwich on a Garlic Poppy Ciabatta

Caprese Sandwich on a Garlic Poppy Ciabatta Roll

This is a total no brainer easy sandwich. The only thing you need to know, is how to turn the knob on your oven to “broil”. 😉

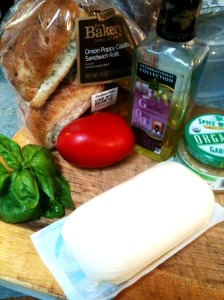
I have started growing some herbs on the deck, and could not WAIT to try my sweet basil.  It smells sooooo good!  I thought I’d make up a quick Sandwich to try it out.  I love fresh mozzarella also, so the first thing that came to mind was Caprese Salad.  Only, I turned mine into a sandwich. Here is what I used….

First I toasted the Garlic Poppy Ciabatta in the oven on broil, to get it a little crispy.  Then took a knife full of the minced garlic, and spread it on both halves of the roll. I layered my fresh basil, tomatoes, and fresh mozzarella slices on the roll. Then drizzled with extra virgin olive oil. I popped it back into the oven for a few minutes to let it warm up and melt together a bit. Then served it open-faced. 

This really hit the spot!  It would also be delish with some balsamic vinegar drizzled on top.

Subway Art

I thought I would share some “Subway Art” that I created for my sis-in-law.  She gave me the “sayings” that she wanted, and told me what kind of colors she wanted…and this is what I came up with.


I sent her the finished file as a jpeg, so she could have them printed at her local(or online) photo store and put in the frames of her choice!  Here is what they look like framed and hung in her home. They are both 20×30. 


Port Angeles

Emma and I went for a road trip last weekend to visit my Dad in Port Angeles, WA.  It’s about a 5.5 hour drive from where we live. We left Friday morning, and returned Sunday evening.

I usually plan fairly well (actually, I usually go overboard) in packing for a road trip that includes Emma. This time…not so much. I guess I should have started packing PRIOR to the morning of our departure. That may have helped. I told Emma what to put in her suitcase, while I was rushing around getting mine packed, feeding and watering cats and plants etc. I forget that she is only 6 yrs old sometimes, and that she is JUST as literal as I am most times.  If I don’t tell her to pack it, she won’t.  We (me), forgot to pack her PJ’s, oops. And we have had SUCH awesome weatherr at home lately, that I didn’t think very hard about coats. I usually have a couple in the car, so I didn’t worry too much about it.  Well, in my haste to clear out room in the car for the dogs bed, and our stuff….I cleared out all the coats. Again, oops. 

Going to Port Angeles this time of year is a crap shoot.  It can be really sunny and nice, or it can pour buckets. This time, it was mostly nice, but it was COLD. And it’s always damper than what we are used to, which makes it feel a little colder AND…..my dad does not use his HEAT, and thinks that 65 degrees is perfectly comfortable. I would agree with him, as long as I have on enough layers and warm socks! I managed to tell her to pack a sweatshirt – but she ended up packing a fleece that has kind of a high neck collar, and she won’t wear it, cuz it feels like it’s choking her. I know, this begs the question…..WHY did you bring THAT ONE then???  I don’t know the answer. And neither did she. So we froze. 🙂   We usually always see some kind of wild life though, and this was no exception. We saw deer walking around the neighborhood…..


Saturday we went down to Ediz Hook spit, which is where the Port Angles Coast Guard Air Station is, and walked along the beach.

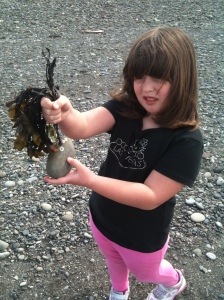
Emma was of course scouring for sea creatures. We did found some really bright colored crab, which was cool, along with some giant kelp and seaweed, lots of Agates, and of course, lots of birds.

We met another wiener dog. You never know when your going to run into one. 🙂

And came across a cool little fort someone had built out of drift wood


More driftwood….

We also stopped at Sunny Farms which is a really cool little local produce and specialty food store that also carries health foods, lots of gluten free stuff, it’s kind of like a smaller Trader Joes.  They also have a nursery with some of the most gorgeous flowers and plants! I was in search of packaged edible flowers, and hoped they would have something like that for cooking, but no such luck. We left with freeze dried wasabi edamame, and dried cantaloupe. I’ve been trying to like wasabi. I don’t know why. On our drive home, I was munching on the edamame, and after accidentally burning my nasal passages 3 times in under 15 minutes, I decided to forget it, and just accept that I DON’T like wasabi. They had tons of beautiful plants and flowers there….

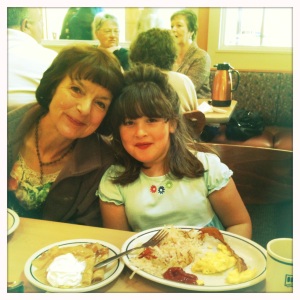
Before we left on Sunday morning, we had to have breakfast at iHop in Sequim.  Ann joined us. Here she is with Emma…..

Then we loaded up the Explorer with a giant solar deck umbrella, some lettuce plant starts, an aloe plant, 3 pots of Crocosmia bulbs, and a drip line system (all courtesy of pops, Thanks Dad!!) that will be this weekends project.  Need to keep my flowers from incinerating in the next heat wave over here. 🙂